![]()
![]()
![]()
![]()
![]()
![]()
![]()
Restoration Project
I found out earlier this year (2006) that my old Sears
3 inch f/16 refractor (Model 4 6339A) is a collector's item and has quite a
bit of value in its optics. The air-spaced achromatic objective is very
well made a nd does perform well. Planetary images for a telescope
of this size are excellent. Thus I felt that this telescope deserves to
be restored to its original beauty and design that it once had in its
early days in 1968 and 1969 when I used it the most in my teen years.
nd does perform well. Planetary images for a telescope
of this size are excellent. Thus I felt that this telescope deserves to
be restored to its original beauty and design that it once had in its
early days in 1968 and 1969 when I used it the most in my teen years.
Some time in the early 1970's I fell in love with the famous Unitron refractor telescope which was always advertised in the Sky and Telescope magazine's back cover page. Thus I had this notion to paint my Sears refractor white just like the Unitron! So I now had an imitation!
Well it took me 35 years to figure out that I had made a terrible mistake doing that! I seen some pictures on various websites of collectors with their prized possessions, Unitron and Sears refractors! So I set out on an ambitious project. I was going to restore this telescope!
 |
 |
| Wherever there were holes that I drilled into the equatorial head, I filled them up using "JB Weld." | Here is another view of the equatorial head with the holes patched up and set aside to harden. |
 |
 |
| This is the main telescope tube. I stripped off all the paint using a good paint stripper. Then I wire-brushed this all smooth using my bench grinder with the wire wheel on it. | I did the same thing with the dew cap. |
|
|
|
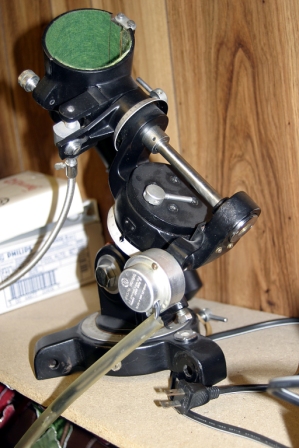
| Here is the equatorial mount head before it was all disassembled, stripped of its paint, holes filled. | Note the clock drive that I had installed on it myself when I was in my late teens. |
 |
 |
| This is an old but functional Bristol Motor. |
It was a 110 volt with 1/10 rpm which corresponded with the worm's revolution of 6 rph. (revolutions per hour) |
 |
 |
|
Here are all the little parts from the mounting all over my work bench! Yes that is a computer mouse! I do have a pc on my work bench too believe it or not! |
Here is the equatorial head all painted and partially reassembled. The old felt in the tube saddle was removed. |
 |
 |
| Every part was either stripped, primed and repainted and all nuts, bolts, and other chrome parts were cleaned and polished with automotive polish and cleaning agents. | Here I am reinstalling the circular level on the equatorial base. |
 |
 |
| The saddle head is being reinstalled on the saddle base. | I made a housing for the clock drive motor. I purchased a metal box from a place I found through Google searches on the internet. This particular one is from Action-Electronics.com. It is the "Crown Royal Chassis" model CR-275. The electrical cord is the 3 pronged grounded outdoor cord and the grommet were purchased at Sears hardware store. |
|
|
|
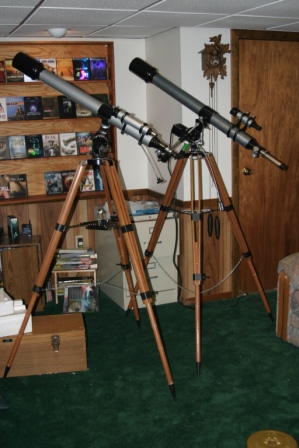
| Here is another view of the clock drive showing the toggle on/off switch that I added to the unit. All the hardware items for this hard drive were purchased at Sears Hardware store. The only items in need of repainting are the tripod hardware pieces and the counterweight itself. | Here is a picture of the fully restored Model 4 6339A refractor on the right. I picked up another one in virtually mint condition from a collector on Astromart.com. Hey, what's wrong with having another one....right? That other one is a beauty too. It came in its original case and everything was in there... right down to every eyepiece and even that dangerous "solar filter" glass eyepiece screw on part! |
 |
|
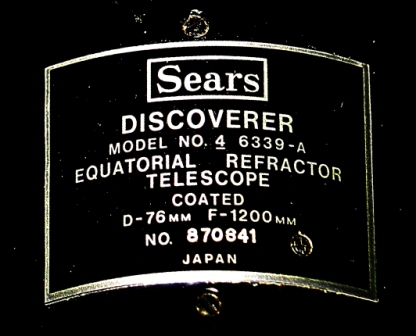
| Another view of the both telescopes. | Here is a closeup of the nameplate located on the top of the focuser bearing the serial number 870841. |


The only thing that wasn't salvageable on my original telescope was the original finderscope. At least the tube wasn't salvageable. I may look around on google.com to see if I can find a replacement aluminum tube. I still have the objective and its cell, and the base of the eyepiece end. But I didn't save the original eyepiece!
Copyright © 2006 Len Marek's Astronomy Webpage. All rights reserved.
Last Updated June 3, 2006